Cesare Brizio
|
Olivarium: una storia di passione, compensato e perseveranza Click qui per il Capitolo II |
|
Olivarium: a story of passion, plywood and perseverance Click here for Chapter II |
|
E' al di là dello scopo di questo contributo illustrare le tantissime ovvie ragioni che spingono quasi tutte le persone serie a diventare collezionisti di conchiglie del genere Oliva Bruguière, 1789, qui genericamente chiamate "Olive" (ma amo anche le Nerite!). Accettiamo questo dato di fatto, e veniamo al dunque: come conservare la nostra collezione (o qualsiasi collezione di oggetti di dimensione tra i pochi centimetri e i 15-20 centimetri).
Passando dal più puro dilettantismo a un collezionismo serio con un'impronta scientifica, ci si rende conto che le conchiglie debbono essere conservate al riparo dalla luce, e in un modo tale da consentire di poter accompagnare ogni esemplare con i suoi dati identificativi. Fin qui, piccoli sacchetti a chiusura ermetica conservati in scatole potrebbero bastare. Ma questo tipo di sistemazione, oltre a essere scomodo da gestire, non consente né di recepire con un colpo d'occhio la varietà delle forme che gli esemplari di una data specie possono assumere, né di svolgere l'importantissima comparazione visuale tra esemplari di specie simili. Insomma, è necessario conservare le conchiglie in un sistema di cassetti a scomparti.
|
|
It's beyond the scope of this paper to illustrate the many obvious reasons why almost all serious people become collectors of shells of the genus Oliva Bruguière, 1789 - herein referred to as "Olives" (but I like Nerites too!). Let's face this fact, and come to the point: how to preserve our collection (or any collection of objects of size between a few centimeters and 15-20 centimeters). Moving from pure amateurism to a more scientific collecting style, one realizes that the shells should be stored away from light, and in such a way that each specimen is stored with its identification data. So far, small airtight bags stored in boxes may do the job. But this kind of arrangement, as well as being inconvenient to handle, does not allow to grasp a glance the variety of forms that the specimens of a given species may assume, nor to perform the all-important visual comparison between specimens of similar species. In short, it is necessary to keep the shells in a system of drawers with compartments.
Attempts to find something suitable on the market, browsing the Web and participating in collectors' events, have lasted months. One can find plastic boxes with compartments with transparent lid, which do not cover the range of sizes required. There are wood cabinets/jewel cases, or cases customized to specific collections, that are both expensive and difficult to find, and in turn do not host compartments suitable for all cases and may not be roomy enough. In short, the only option is to build a custom-made cabinet, based on drawers with compartments, them also made to measure.
Have a furniture manufacturer to accomplish such a cabinet can bring the cost close to 1,000 Euros. With approximately 25% of this sum and with an inordinate amount of time, you can do it yourself. I decided to try after seeing the wonderful work that my friend Giorgio did for his giant collection of Olives, readjusting - over a period of three years of work - an old typographic cabinet, with an expenditure of time and money that I don't even want to imagine. My own cabinet is a scaled-down, very unrefined version of Giorgio's beautiful, professional drawers cabinet.
As a whole, without regard to the time for the preparation and printing of the seashells' tags, and including the time spent in gradually buying the material needed and painting the exterior of the cabinet, the work took about 160 hours, divided among many weekends and weekday evenings.
|
|
Per rendere realizzabile il mio grande progetto, commisurandolo alle mie scarse capacità e dotazioni tecniche, e allo stesso tempo contenendo il budget, ho dovuto necessariamente adottare alcuni compromessi. Il primo è stato quello di NON costruire i cassetti, ma di basarmi su contenitori in legno già pronti. I requisiti dimensionali includono una profondità di 5 cm, sufficiente a ospitare le Olive più grandi (ci si possono aspettare esemplari "oversize", ma non bisogna basare l'intero progetto su casi eccezionali che ben difficilmente saranno incontrati) ma comunque non esagerata per quelle più piccole. Un elemento di flessibilità sulla capienza dei cassetti è dato dalla possibilità di aumentare lo spazio verticale che li separa, potendo così ospitare conchiglie più alte. In pratica, come illustrato sotto, ho optato per la distanza verticale di 1 cm tra i cassetti. Dopo varie ricerche, ho deciso di adottare i vassoi in legno di betulla prodotti dalla ditta SISO (la versione attualmente in produzione qui illustrata è più piccola di quella da 51,5 cm di lunghezza utile interna che ho utilizzato nella mia realizzazione). |
|
To make my big project feasible, commensurate with my limited skills and technical equipment, and at the same time to limit the budget, I necessarily had to adopt some compromise. The first was to NOT build the drawers, but to start from ready-made wooden containers. Size requirements included a depth of 5 cm, enough to accommodate the largest Olives (one can expect some "oversized" specimens, but the whole project should not be based on exceptional circumstances which will hardly be met) but not overwhelming for the smaller ones. An element of flexibility on the capacity of the drawers is the ability to increase the vertical space separating them, thus being able to accommodate higher shells. In practice, as shown below, I opted for the vertical distance of 1 cm between the drawers. After much research, I decided to use the birch wood trays produced by SISO (the version currently in production shown here is smaller than 51.5 cm inside length trays that I have used in my implementation). |
|
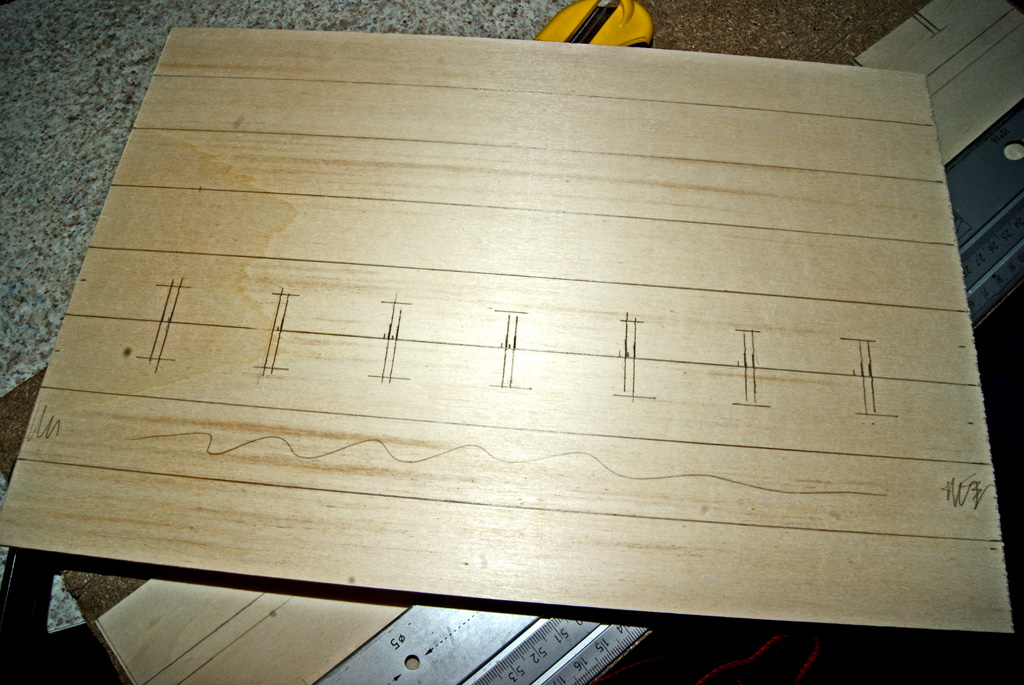
Una volta definite le dimensioni interne del cassetto, è stato necessario definire il materiale per realizzare gli scomparti: la loro altezza, 3 o 4 cm, era incompatibile con un taglio a macchina presso un grande centro di bricolage. Per potere procedere a un taglio manuale con cutter professionale, e per massimizzare lo spazio disponibile per le conchiglie, ho optato per il compensato da 3 mm. A questo punto, nota dimensione interna del cassetto e dimensione dei divisori, ho calcolato la posizione degli incastri nei divisori per le tre/quattro categorie di dimensione delle conchiglie. Per fare questo, ho creato un apposito foglio Excel. Le formule non sono particolarmente complesse: la dimensione D di ogni cella lungo un lato L per un numero di celle N e spessore del divisiorio S è pari a |
|
Once the internal dimensions of the drawer are defined, it's necessary to define the material to make the dividers: their height, 3 or 4 cm, is incompatible with cutting machines available at the large home improvement centers. To be able to cut them manually with a professional cutter, and to maximize the space available for the shells, I opted for 3 mm plywood. At this point, knowing the internal dimension of the tray and the size of the dividers, I calculated the position of the slots in the dividers for the three / four categories of shell dimension. To do this, I created a special Excel spreadsheet. The formulas are not particularly complex: the dimension D of each cell along a side L for a number of cells N and divider thickness S is equal to |
|
Per partire con le attività pratiche, occorre innanzitutto farsi tagliare in un centro di bricolage i riquadri di compensato da 3 mm da cui ricavare i divisori. La larghezza necessaria (quella dei divisori) sarà pari al lato interno del cassetto meno 2mm,l'altezza, considerato che ogni divisiorio sarà alto 3 cm nei cassetti destinati a esemplari piccoli e medi, 4 cm negli altri casi, sarà un multiplo intero di 3 o di 4 come necessario. |
|
To start with hands-on activities, one must first have 3 mm plywood panels cut by a DIY center, from which to derive the dividers. The required width (dividers' width) will be equal to the inside dimension of the drawer minus 2mm, while panel height, given that each divider will be 3 cm in drawers intended for small and medium sized specimens, 4 cm in the other cases, will be an exact multiple of 3 or 4 as required. |
|
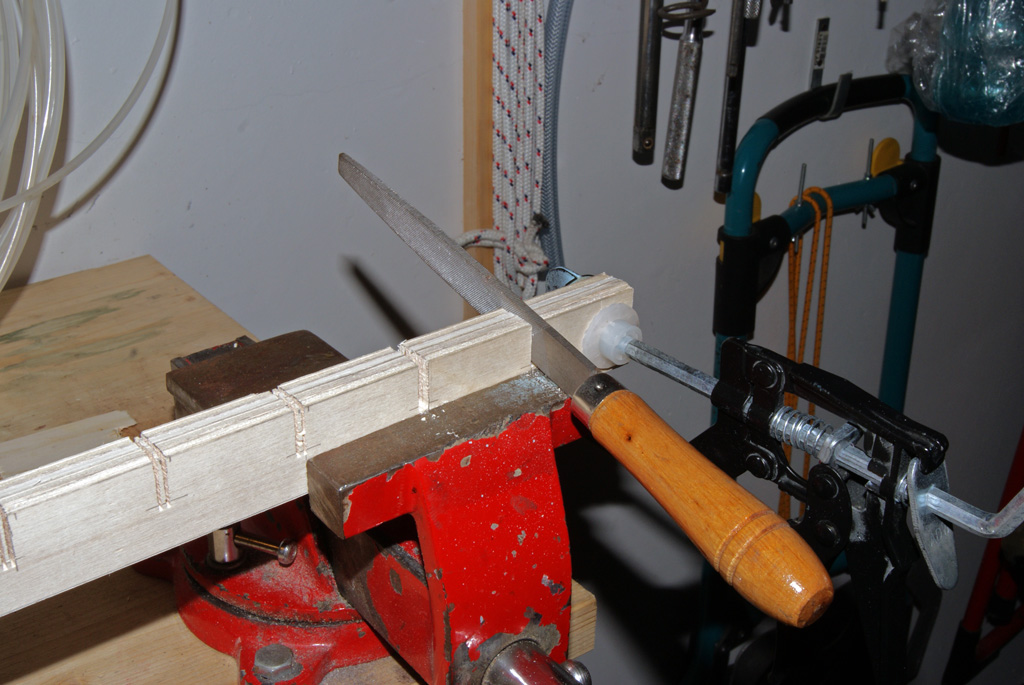
In tutto il lavoro, gli strettoi sono l'attrezzo fondamentale. Il taglio dei divisori avviene con un cutter professionale "heavy duty" con lama da un pollice d'altezza. Una riga metallica viene usata come appoggio per la lama durante il taglio, garantendo la perfetta linearità dello stesso. |
|
Throughout the work, the clamps are the fundamental tool. The dividers' cutting is done with a professional "heavy duty" cutter with 1" high blade. A metal ruler is used to guide the knife during the cutting, ensuring the perfect linearity of the cut. |
|
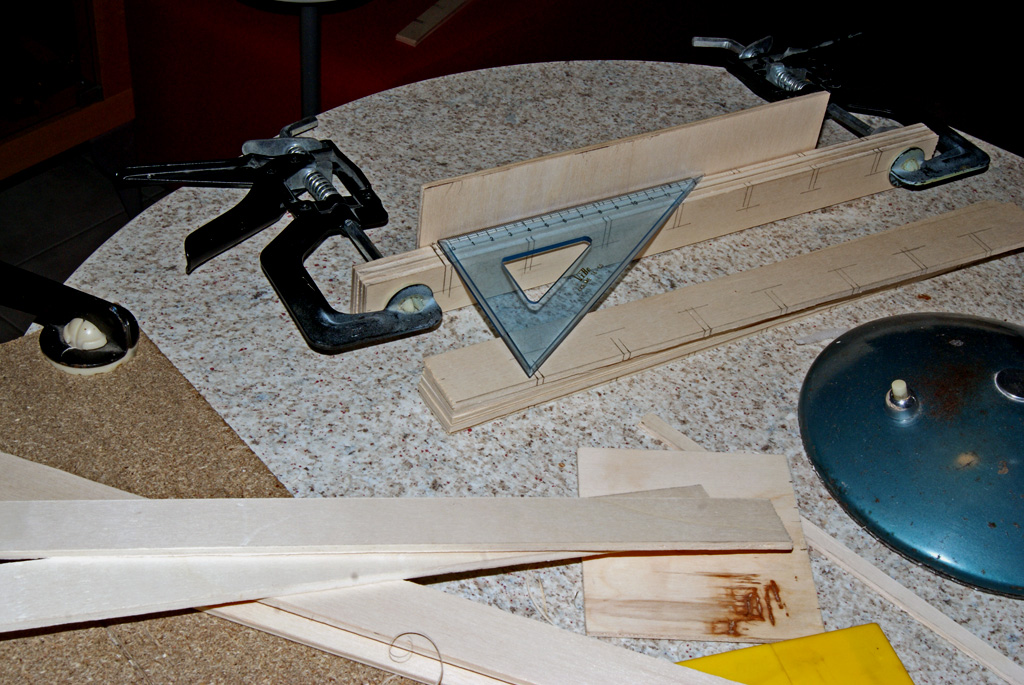
Una volta tagliati tutti i divisori di un gruppo, viene composto il "pacchetto", con all'esterno i due divisori con gli incastri disegnati. |
|
Once you have cut all the dividers of a group, a "package" is composed, with the two outside dividers marked with the slots. Also in this case the clamps are needed to ensure the alignment. With a small set-square, the cutting lines of the joints are marked on the upper side of the package of dividers. |
|
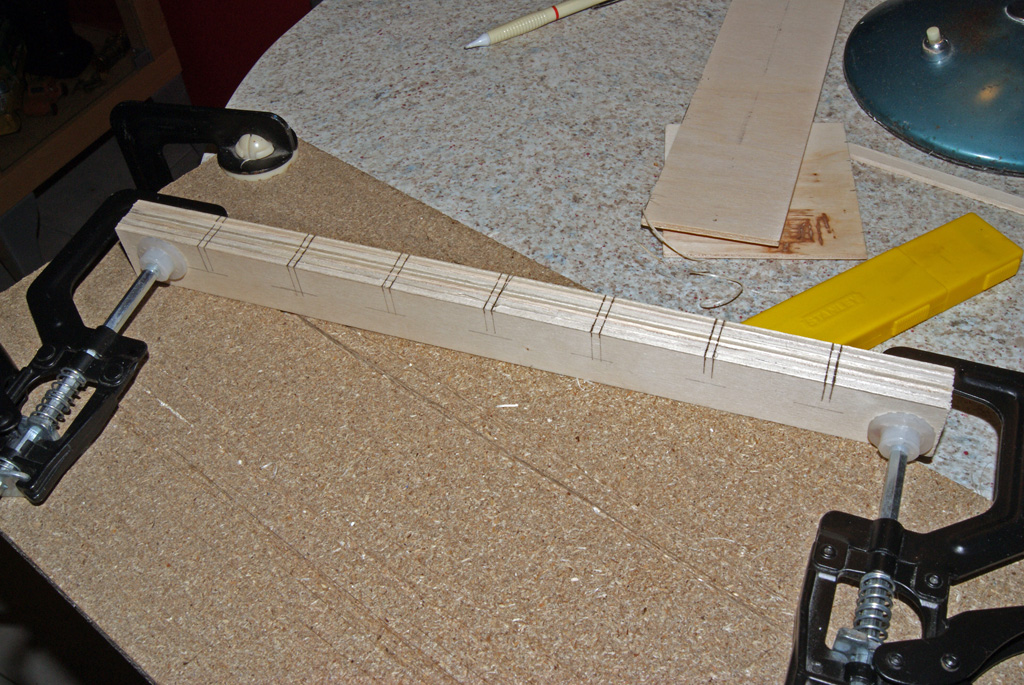
Ecco il pacchetto di divisori pronto per il taglio. |
|
Here is a package of dividers ready for the cutting. |
|
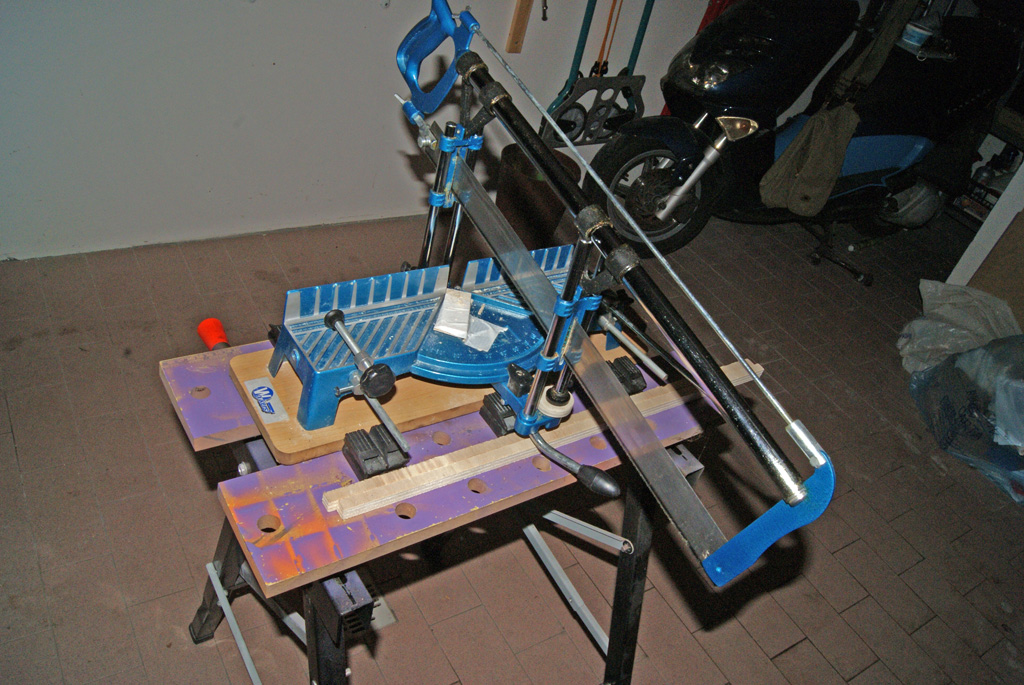
Il taglio viene effettuato con una sega per cornici. Ne possedevo già una, ma tutto considerato anche acquistarla appositamente è un investimento consigliabile, vista l'enorme quantità di tempo che può fare risparmiare. |
|
The cut is made with a framing saw. I already had one, but all in all it's anyway an especially advisable investment, given the huge amount of time you can save. The saw retainers should be positioned at an half divider-heigth, so that the saw blade can not drop more than 1.5 cm in 3 cm high dividers and no more than 2 cm in 4 cm dividers (see white washers and retainer next to the saw blade). |
|
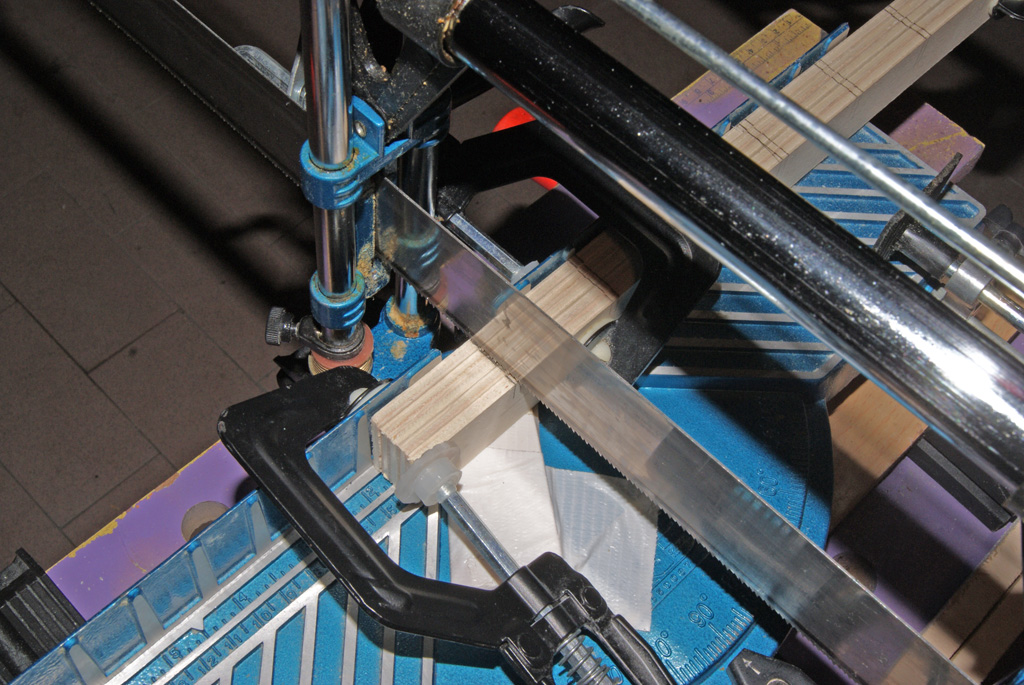
Per ogni incastro, la sega farà due tagli a circa 2,5 mm di distanza. Il posizionamento deve essere molto accurato e deve essere mantenuto con gli strettoi (quelli in dotazione al piano di taglio della sega per cornici sono troppo distanti dalla lama per essere utili, specialmente nelle fasi iniziali del taglio). |
|
For each slot, the saw will make two cuts approximately 2.5 mm apart. The placement must be very careful and should be maintained with the clamps (the ones attached to the cutting plane of the framing saw are too far away from the blade to be useful, especially in the early stages of the cut). |
|
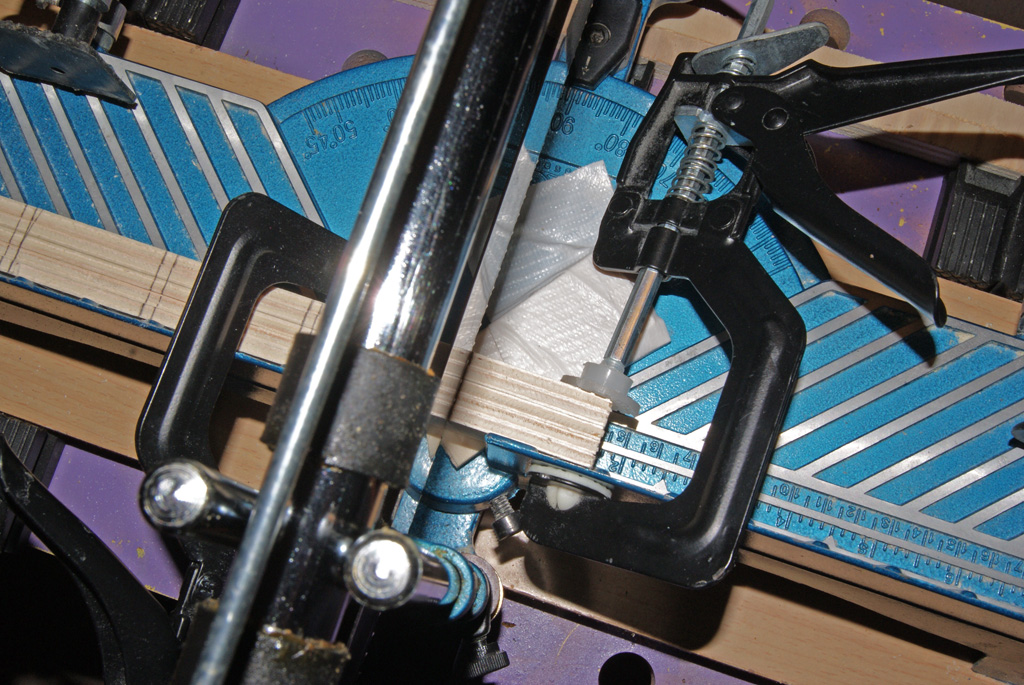
Dettaglio del bloccaggio del pacchetto di divisori al momento del primo taglio. |
|
Detail of the dividers package clamping at the time of the first cut. |
|
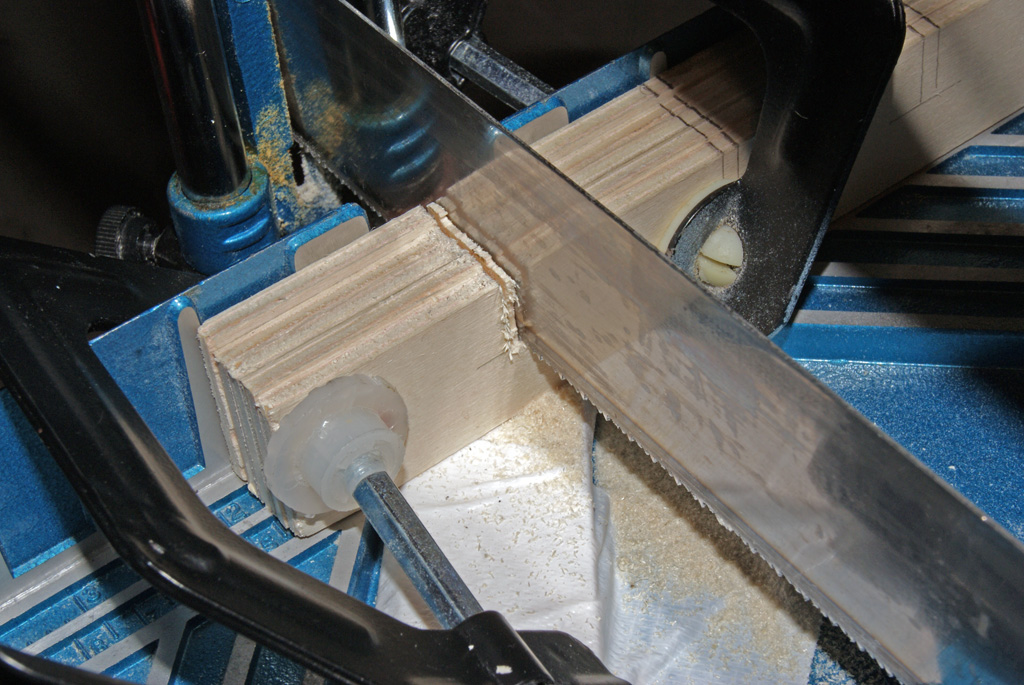
Situazione al secondo taglio. La lama a fine corsa non supera la metà altezza dei divisori. |
|
Situation at the second cut. The blade at its travel end does not exceed half the dividers' height. |
|
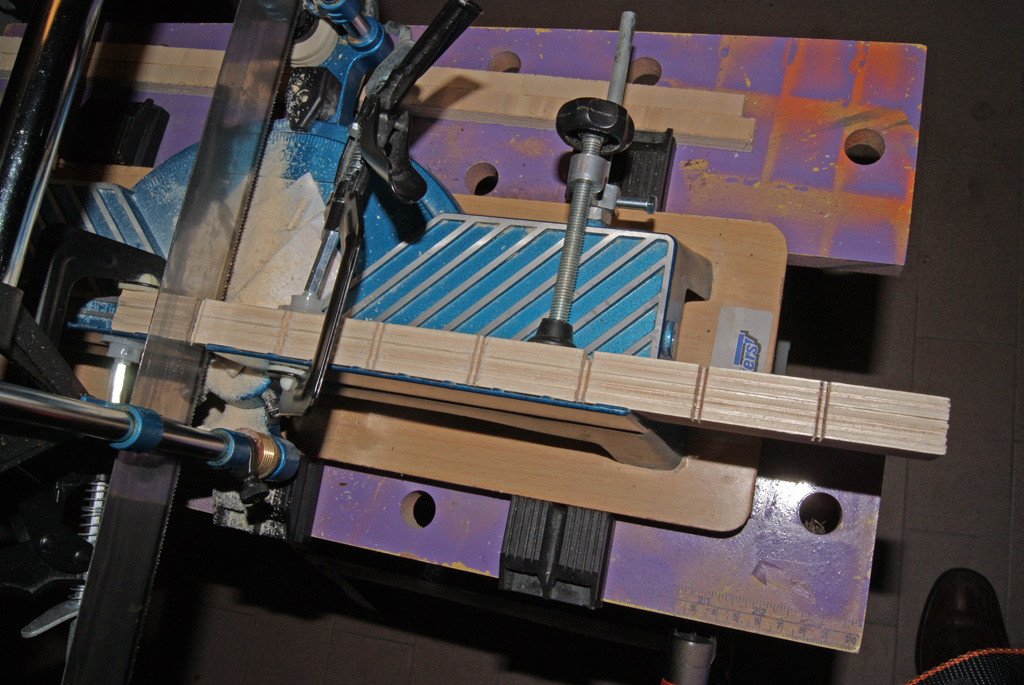
Avanzando oltre metà della lunghezza, viene impegnato anche lo strettoio in dotazione al piano di taglio della sega per cornici. Questa è la situazione all'ultimo taglio di un pacchetto di divisori lunghi. |
|
Advancing more than half the package length, also the clamps attached to the cutting plane of the framing saw are engaged. This is the situation at the last cut of a package of long dividers. |
|
A tagli ultimati, bisogna ripulire gli incastri. Mantenendo il pacchetto stretto fra gli strettoi e con l'aiuto della morsa, si procede a scalzare i residui di legno dall'incastro con un cacciavite con lama da 2 mm, affilato. |
|
Once cutting is finished, the slots must be cleaned. Keeping the pack sandwiched between the clamps and with the help of the vice, wood residues are removed with a sharp screwdriver with 2 mm blade. |
|
Una volta liberati dai residui di taglio, gli scassi sono limati con una lima a facce parallele da 3 mm di spessore. E' necessario verificare che il taglio sia sufficientemente largo inserendo un pezzetto di compensato da 3 mm nell'incastro, che non deve stringere ma neppure andare largo. |
|
Once freed from cuttings, slots are filed with a parallel-faces file 3 mm thick. It's necessary to verify that the slot is wide enough by inserting a piece of 3 mm plywood in the slot, that should not get stuck nor fit too loosely. |
|
A questo punto, un divisorio alla volta, si carteggiano tutti gli spigoli. E' normale che i divisori esterni al pacchetto, quelli su cui erano disegnati gli incastri, subiscano l'azione della sega in modo più deciso. Questi incastri saranno leggermente slabbrati e potranno richiedere un po' di carteggio sulla superficie esterna. |
|
At this point, a partition at a time, all edges are smoothed with sandpaper. It's normal that the dividers outside of the package, those on which the slots were drawn, undergo to the action of the saw in the strongest terms. These joints will be slightly overblown and may require a bit of sandpaper on the outer surface. |
|
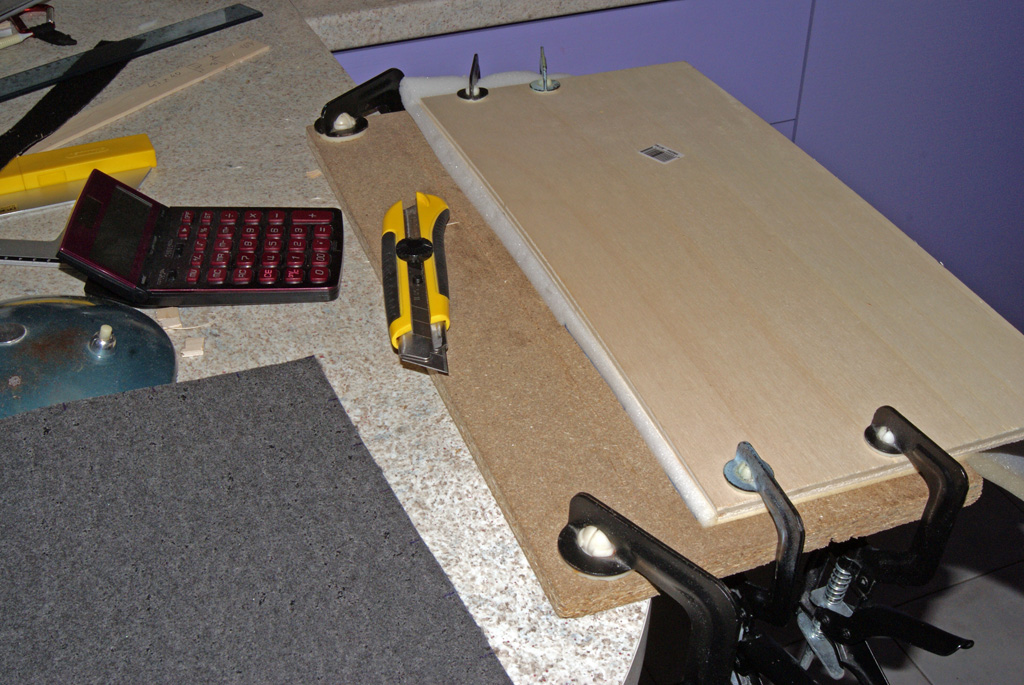
Come sarà illustrato più sotto, per potere inserire un cartellino in ogni cella senza impedire la vista della conchiglia, e anche per proteggerla e evidenziare il contrasto dei colori, ogni cella deve ospitare un "cuscinetto" di gommapiuma da 1 cm e un fondo di colore nero o chiaro (ho preferito un grigio a un bianco), comunque tagliato su misura. Nel mio caso ho optato per un rivestimento sintetico spesso circa 2 mm. La prima operazione da fare è rifilare il riquadro di gommapiuma perchè abbia tutti i lati perpendicolari. |
|
As will be explained below, in order to insert a small card in each cell without blocking the view of the shell, and also to protect and highlight the color contrast, each cell must accommodate a "cushion" of 1 cm foam and a base of black or light (I preferred gray rather than white) synthetic coating, 2 mm thick, both cut to measure. The first thing to do is trim the foam so that all its sides are perpendicular. |
|
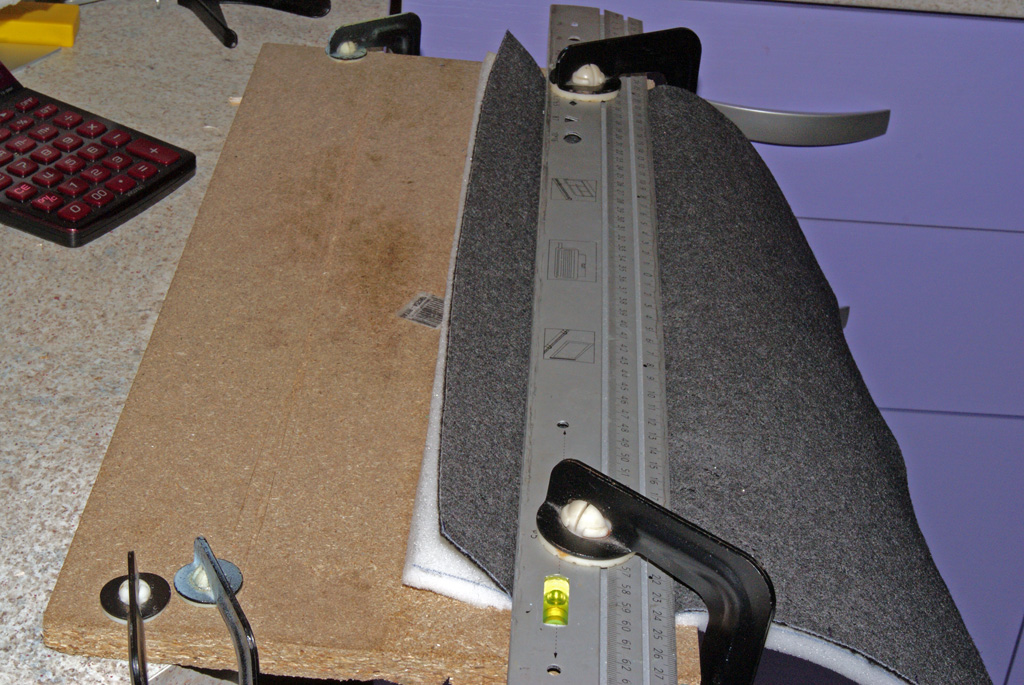
Dopo avere ritagliato un riquadro di rivestimento nero e uno di gommapiuma della dimensione necessaria (pari alla superficie delle celle al netto di quella dei divisori - questa operazione non è documentata nelle fotografie), si riportano sul bordo esterno del lato inferiore del rivestimento le misure di larghezza e altezza delle celle (osservando attentamente la foto, potrete notare piccole tacche blu sul bordo esterno). Quindi, si sovrappongono esattamente gommapiuma e rivestimento e, sempre aiutandosi con riga metallica e stringitoi, si procede al taglio delle strisce, una per colonna di celle, con il cutter professionale. La gommapiuma consuma rapidamente la lama del cutter, quasi quanto il legno, ed è necessario cambiarla di frequente. |
|
After cutting out a panel of black coating and one of foam of the required size (equal to the surface of the cells not including the dividers - this operation is not documented in the pictures), width and height of the cells are marked on the outer edge of the lower side of the coating (looking closely at the picture, you will notice small blue marks on the outer edge). Then, after exactly overlapping foam and coating, and always with the help of metal ruler and clamps, one proceeds to the cutting of strips, for a column of cells, with the professional cutter. The foam quickly consumes the cutter blade, almost as much as wood, and frequent changes are needed. |
|
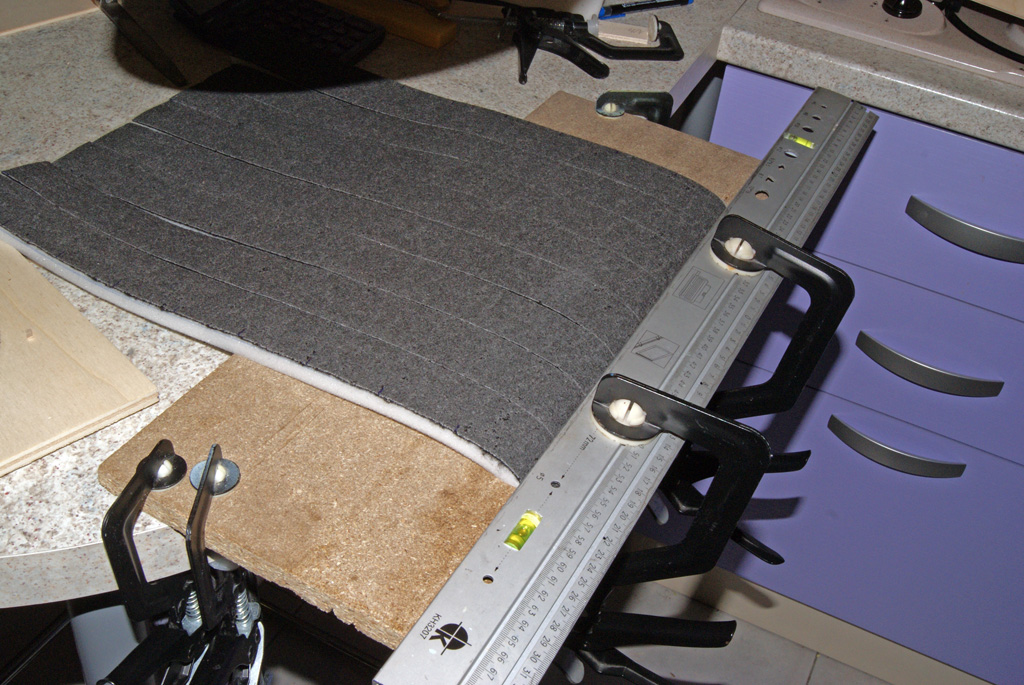
Per passare al taglio dei singoli riquadri di gommapiuma e rivestimento necessari per ogni cella, è necessario ricomporre con il migliore allineamento possibile le strisce ottenute al passo precedente e, come sempre, aiutarsi con riga metallica e cutter. |
|
To move to cutting individual panels of foam and coating required for each cell, it is necessary to reconstruct the best possible alignment of the strips obtained in the previous step and, as always, help oneself with metal ruler and cutter. |
|
Si arriva così al momento magico di allestimento del cassetto. I divisori delle "colonne" che corrono nel senso della lunghezza sono messi sopra con gli incastri verso il basso, i divisori delle "righe" che corrono nel senso della larghezza sono messi sotto con gli incastri verso l'alto. La strategia che ho copiato da Giorgio è quella di riservare una cella laterale sinistra all'indicazione del nome della specie. Questa cella è sopralzata con un doppio spessore di gommapiuma. I cartellini dei nomi specie, di cui non descrivo la preparazione, debbono ovviamente essere preparati a parte e tagliati a misura delle diverse dimensioni di cella che appaiono nei cassetti. |
|
Then comes the magic moment of preparation of the drawer. The "columns" dividers that run along the drawer's length are put above with the slots facing down, the "rows" dividers that run across the width are put below with the slots facing up. The strategy that I copied from Giorgio is to reserve one cell at the left side for the name of the species. This cell is made higher with a double thickness of foam. The species names tags, whose preparation I do not describe, must of course be prepared separately and cut to size of the different cell sizes that appear in the drawers. |
|
La vista laterale consente di cogliere il senso dello spessore di gommapiuma come strumento per mantenere in posizione il cartellino descrittivo di ogni esemplare. La preparazione iniziale di questi cartellini si è appoggiata a un vecchio database Clipper su cui avevo memorizzato i dati di tutte le mie conchiglie, che alimenta una griglia ricavata in Microsoft Word. Più di recente, lavoro direttamente in Word, senza usare il vecchio DB. |
|
The side view allows you to grasp the meaning of the thickness of foam as a tool to keep in place the descriptive label of each specimen. The initial preparation of these tags leaned an old Clipper database on which I had stored data of all my shells, which fed a grid drawn in Microsoft Word. More recently, I work directly in Word, without using the old DB. |
|
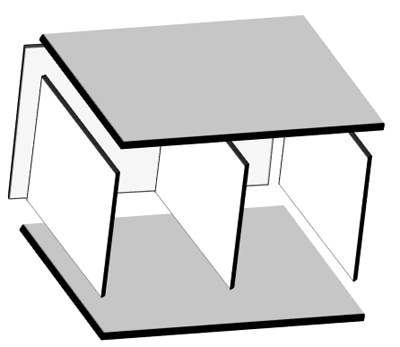
I cassetti sono pronti: è il momento di costruire il mobile, che è caratterizzato dalla più semplice struttura possibile. Sul frontale, saranno montati due riquadri di compensato da 3 mm a ribaltina, con cerniere esterne e apertura verso il basso. Il materiale scelto per il mobile è compensato da 16 mm. Le pareti del mobile sono state dimensionate per avere circa mezzo centimetro di margine rispetto alla lunghezza del cassetto, in modo che le porte anteriori possano appoggiare sul frontale dei cassetti restando a filo con il mobile. |
|
The drawers are ready: it's time to build the cabinet, which is characterized by the simplest structure possible. On the front, two flapping 3 mm plywood panels will be mounted with external hinges and opening downward. The material chosen for the cabinet is 16 mm plywood. The walls of the cabinet have been sized to have about half a centimeter of margin with respect to the length of the drawer, so that the front doors may rest on the front of the drawers and remain flush with the cabinet. |
|
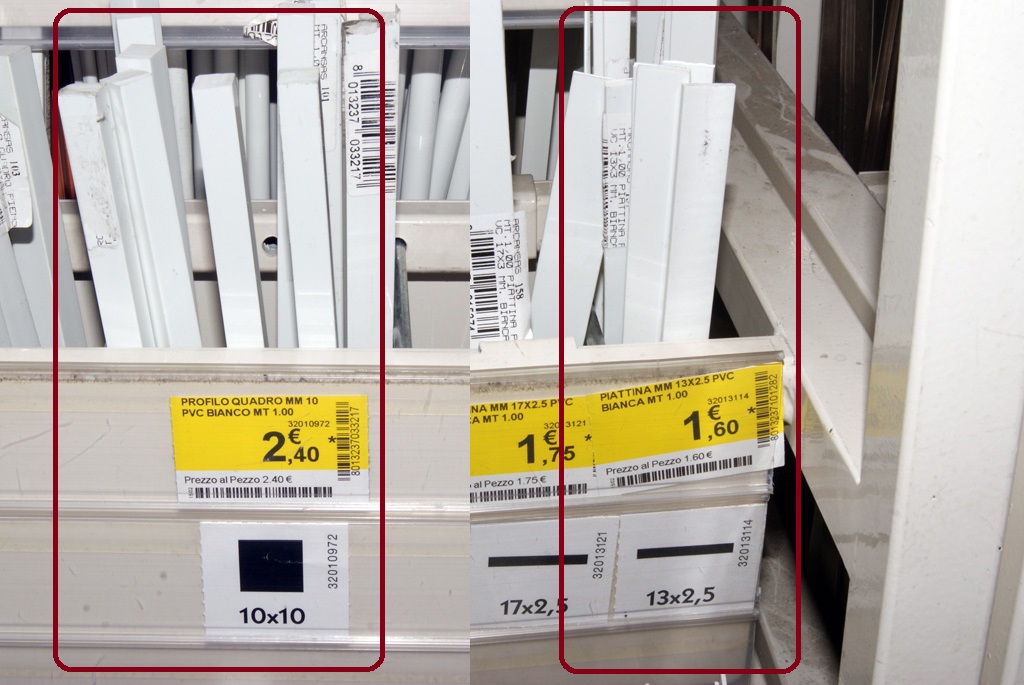
I cassetti saranno in appoggio su barrette di PVC tagliate a misura, dello spessore di 1 cm. La materia prima è agevolmente reperibile in qualsiasi centro di bricolage. Il cassetto di fondo scorrerà su strisce dello stesso materiale. |
|
The drawers will be resting on PVC bars cut to size, 1 cm thick. The raw material is easily available at any home improvement center. The bottom drawer will slide on strips of the same material. |
|
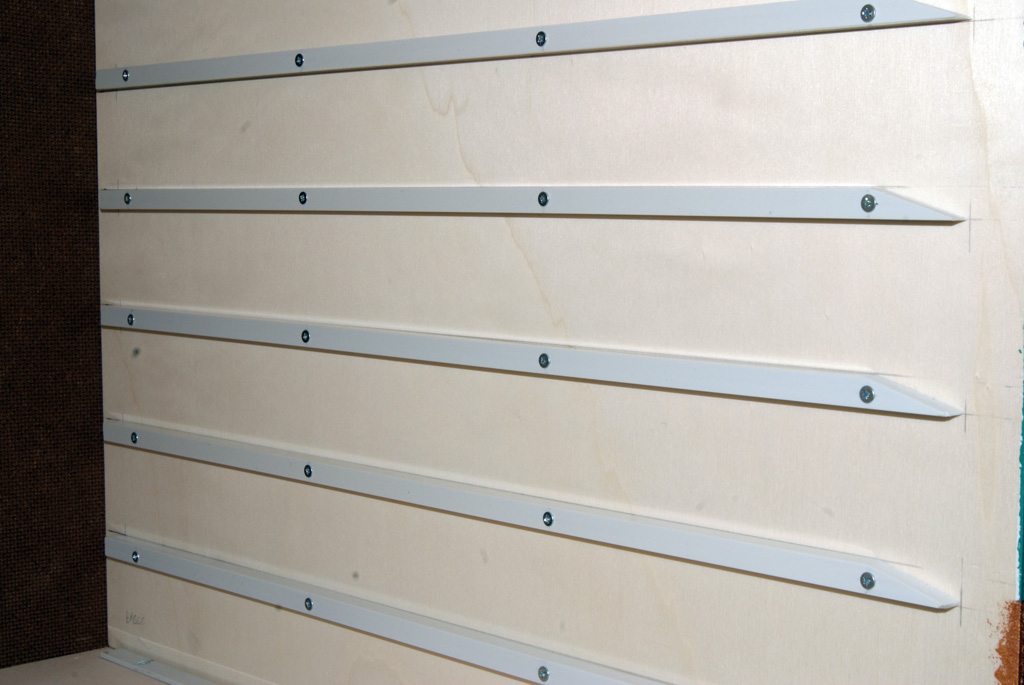
Il divisore centrale del mobile ospiterà una file di barre di PVC su ogni lato. Le viti da utilizzare non dovranno penetrare per più di 8 mm, per non colpire le viti dal lato opposto. Si nota l'invito inclinato ricavato su ogni barra (con sega da traforo e lima) per agevolare l'introduzione dei cassetti. La distanza tra le barre, per cassetti alti 48 mm, è pari a 50 mm, sufficienti a garantire il gioco necessario ai cassetti e a guidarli senza intoppi in fase di estrazione. Uno spazio di manovra così piccolo è anche funzionale a lasciare il cassetto parzialmente estratto senza timore che scivoli o si inclini troppo. Inutile dire che, con tolleranze millimetriche, la misurazione e il disegno della posizione delle guide di PVC deve essere molto accurata. |
|
The cabinet's middle divider will host a row of PVC bars on each side. The screws to be used should not penetrate more than 8 mm, not to hit the screws from the opposite side. You notice the inclined ramp formed on each bar (with jigsaw and file) to facilitate the introduction of the drawers. The distance between the bars, for drawers 48 mm high, is 50 mm, enough to ensure the necessary clearance for the drawers and to guide them smoothly during the extraction phase. Such a little room for maneuver is also functional to allow leaving the drawer partially extracted without fear that it may slip or get too inclined. Needless to say, with millimetric tolerances, the measurement and the marking of the position of the PVC guides must be very accurate. |
|
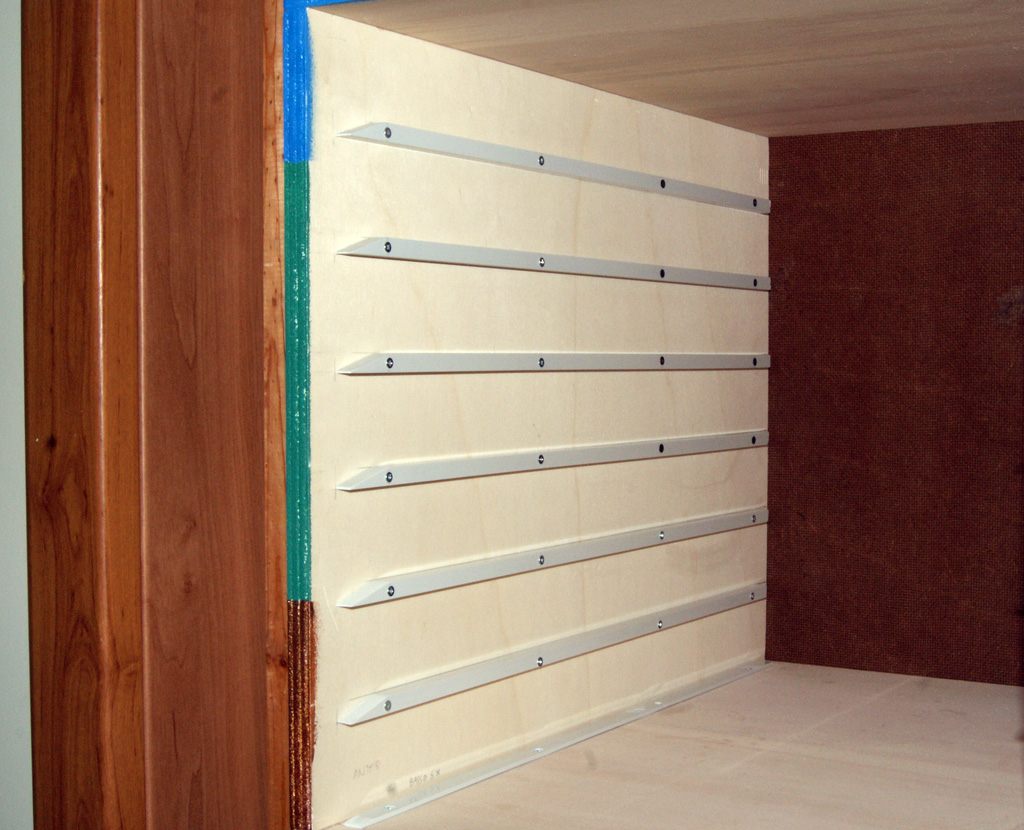
Le guide laterali sono disposte secondo lo stesso criterio. Da notare che i fori per le viti sono stati realizzati su due diametri, in modo che la testa della vite potesse scomparire internamente alla guida in PVC. Lavoro molto meticoloso in particolare per le strisce di fondo. |
|
The side guides are arranged according to the same criteria. Note that the holes for the screws were made on two diameters, so that the screw head could disappear inside the PVC guide. A very meticulous work, in particular for the bottom strips. |
|
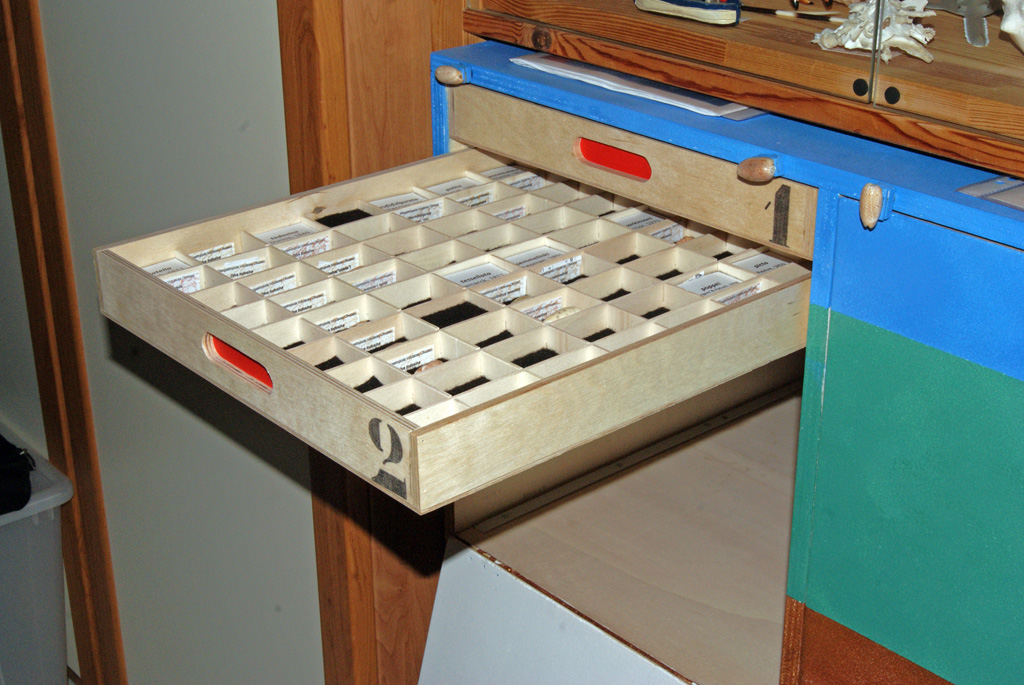
Ecco come appare il cassetto estratto. I cassetti sono numerati per esigenze di riferimento. Visto che il legno non trattato tende a spandere qualsiasi tipo di colore in modo incontrollabile, e visto che un numero su targhetta metallica sarebbe sporto dal cassetto impedendo la chiusura degli sportelli anteriori, si è optato per l'uso della matita (con una passata di fissativo spray). |
|
Here's how the drawer is pulled out. The drawers are numbered for reference purposes. As untreated wood tends to spread any type of color uncontrollably, and given that a metal number plate would protrude from the tray, preventing the closure of the front doors, it was decided to use the pencil (with a pass of spray fixative). |
|
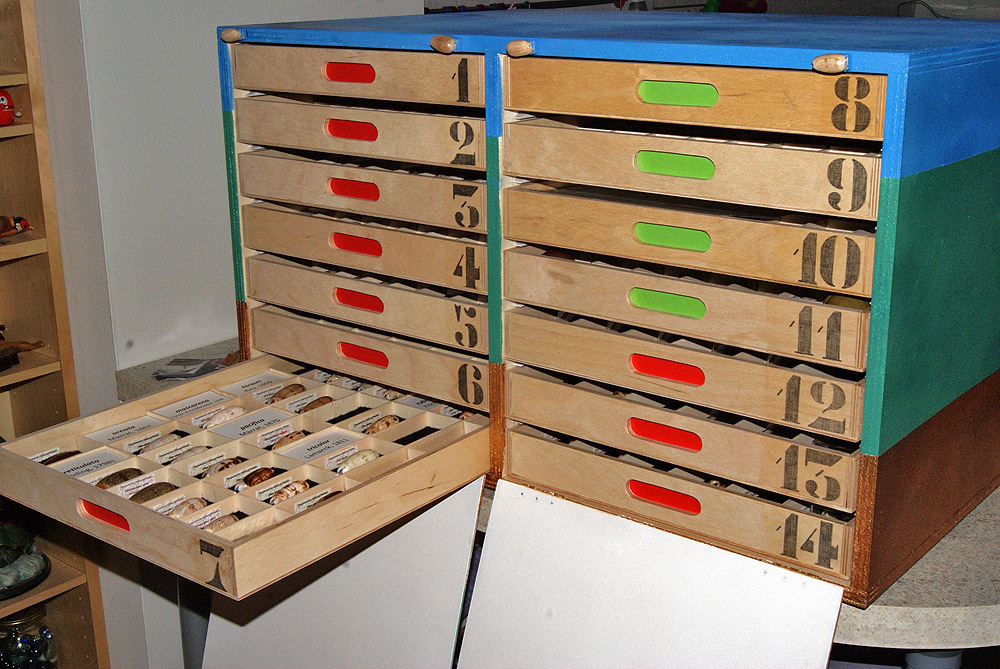
Ecco il mobile con tutti i cassetti montati. Un riquadro di cartoncino colorato, visibile dall'apertura anteriore del cassetto, contraddistingue i cassetti di Olive da quelli dedicati alle Nerite. |
|
Here's the cabinet with all the drawers mounted. A frame of colored cardboard, visible from the front of the drawer, distinguishes the drawer of Olives from those dedicated to Nerites. |
|
L'esterno del mobiletto, assemblato con semplice ricorso a viti autofilettanti e con il fondo posteriore inchiodato, è stato innanzitutto verniciato con due strati di fondo tipo "cementite" bianca, per protezione e per dare risalto ai colori. Lo stesso trattamento è stato applicato anche all'interno degli sportelli. L'esterno del mobile è stato verniciato a spugna con un mix di colori acrilici, e con uno strato di finitura lucida. Come ho già fatto per molti pannelli ornamentali che ho in casa, le tre fasce colorate rappresentano, dal basso all'alto, la spiaggia, il mare e il cielo. |
|
The exterior of the cabinet, assembled with simple use of self-tapping screws and the rear end nailed, was first painted with two layers of white "cementite" undercoat, for protection and for intensifying the colors. The same treatment was also applied to the inside of the doors. The exterior of the cabinet was then sponge-painted with a mix of brilliant acrylic paints and with a glossy finishing coat. As I have done for many ornamental panels I have at home, the three colored bands represent, from bottom to top, the beach, the sea and the sky. |
|
Gli sportelli sono stati dotati di due piccoli pomelli e di due piccoli bloccaggi rotanti, ognuno ornato con una Oliva concavospira. Nel complesso, il risultato non è certo perfetto, ma certamente è adeguato ai miei obiettivi. Il mobiletto, con i suoi cassetti a scomparti, è diventato uno strumento chiave per educare il mio occhio al riconoscimento delle specie di Olive e per svolgere paragoni tra specie diverse. |
|
The doors have been fitted with two small knobs and two small rotary catches, each adorned with an Oliva concavospira. Overall, the result is not perfect, but it is certainly appropriate to my goals. The cabinet, with its drawers with compartments, has become a key tool to educate my eye to the recognition of Olives species and to perform comparisons between different species. |
|
Grazie per avere seguito fin qui le mie spiegazioni. Se vorrete provare anche voi a fabbricare un mobiletto simile, mi raccomando di ricordare che, anche per un risultato come il mio, non impeccabile (possono esistere alcuni millimetri di differenza tra un divisorio e l'altro anche nello stesso cassetto...), ci vuole tanto tempo e tanta meticolosità. Ma vedere i propri esemplari ben allineati e ordinati giustifica pienamente la fatica. |
|
Thank you for following my explanations so far. If you also want to try to manufacture a cabinet like that, I highly recommend you to remember that, even for a result like mine, not flawless (there may be a few millimeters of difference between a partition and the other even in the same drawer ...), so much time and thoroughness are needed. But seeing one's specimens properly aligned and sorted, fully justifies the effort. |